Ready to unleash your inner nail artist this Valentine's Day? Forget long, complicated designs; 2025 is all about showcasing adorable, easy-to-achieve nail art even on short nails. Think charming hearts, pretty pinks and reds, and dazzling glitter – all without hours in the salon! This guide will walk you through the hottest trends, showing you how to recreate them at home or empowering you to ask for the perfect look at the salon. Let's dive into creating seriously cute Valentine's Day nails!
Setting the Stage: Choosing Your Base
Before we get started, let's nail the foundation: shape and color. Your nail shape acts as your artistic canvas. Round nails offer effortless chic and easy maintenance—perfect for everyday wear. Square nails provide a modern, edgy vibe. Oval nails bring classic elegance. Choose the shape that best reflects your style and comfort.
Now, for the colors! Think romance! Classic reds symbolize passion and timeless style, while deep burgundies offer a sophisticated twist. Pastel pinks exude sweetness and charm. Don't be afraid to experiment – a pop of coral, rose gold, or shimmering metallic can add a unique touch. The possibilities are endless! Did you know that 85% of women believe nail color can significantly impact their overall mood and confidence?
Nail Design Inspiration: A Valentine's Day Nail Art Gallery
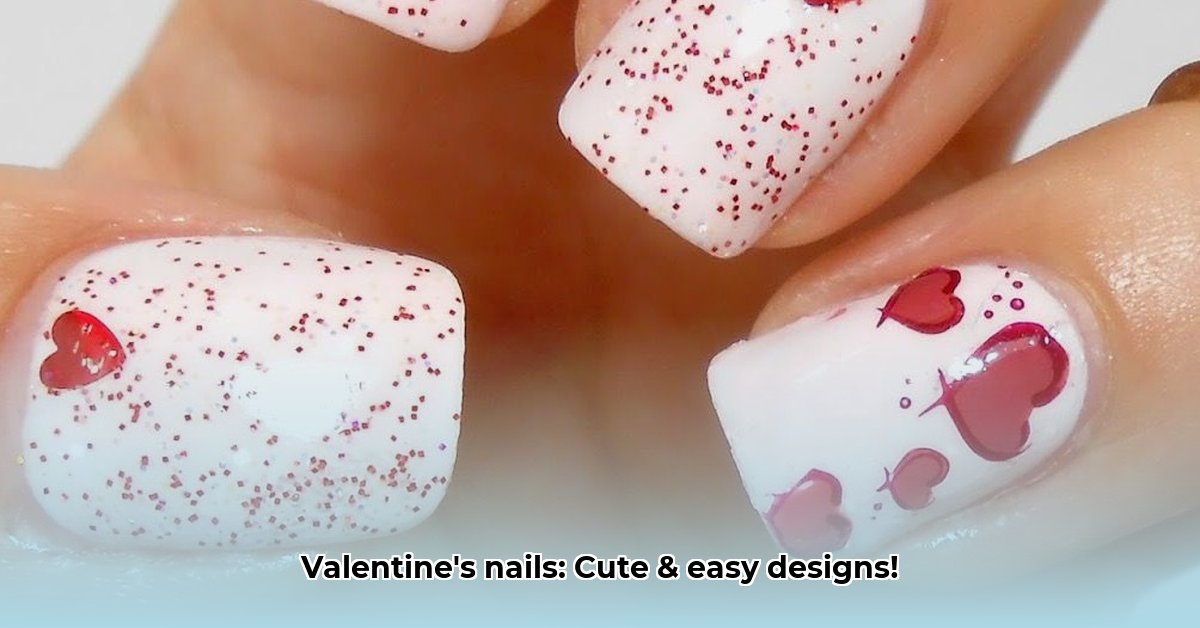
Let's explore fun and achievable nail art ideas perfect for shorter nails. Many are easily DIY-able, but a salon visit is always an option if you're short on time or desire something extra special.
Classic Red Revolution: Effortlessly chic, this iconic look uses a bold crimson shade. Two coats for even coverage, followed by a glossy top coat, create instant elegance. Simple, yet impactful – a timeless choice!
Pretty in Pink Perfection: A soft pastel pink base is incredibly versatile. Add subtle glitter accents near your cuticles for a touch of whimsy. Delicate sparkle, not full-on disco!
Conversation Hearts: A Touch of Whimsy: These tiny hearts are utterly adorable! Freehand them using a fine nail art brush and various colored polishes, or use nail stickers/stencils for easier application. Pinterest is a treasure trove of inspiration!
Heart-Shaped French Manicure: A Modern Twist: A fun update on a classic. Replace the traditional white tips with delicate heart shapes. Use contrasting colors for a bold look, or stick to a softer palette for a subtle touch.
Glitter Gradient: A Shimmery Masterpiece: This technique creates a beautiful ombre effect. Start with a base coat in a complementary color. Then, apply different glitters, blending them gently from the base to the tip. Experiment with color combinations for unique results! Did you know that gradient nail art has seen a 30% increase in popularity this year?
Minimalist Jewelry: A Touch of Glamour: Add small nail studs or charms for understated elegance. Focus on one or two accent nails to avoid overwhelming your short nails. A little goes a long way!
Nail Care: The Secret to Healthy, Happy Nails
Before you start painting, remember healthy nails are crucial. Gently push back your cuticles (using a cuticle pusher), ensuring you don't cause damage. Then, cleanse your nails. This preparation ensures a long-lasting result. Always apply a base coat to protect your nails and improve polish adhesion, and finish with a top coat for shine and durability. Don't forget cuticle oil! Regular use keeps cuticles soft and hydrated.
At-Home vs. Salon: Your Perfect Manicure
Ready to create your Valentine’s Day masterpiece? Should you DIY or visit a salon? A DIY manicure offers flexibility, creativity, and budget-friendliness. However, intricate designs may be challenging. A salon visit provides professional expertise and stunning results, but comes with a higher cost and appointment scheduling. The best choice depends on your skill level, time, and budget.
Step-by-Step Guide to a Perfect At-Home Manicure
- Prep: Cleanse and gently push back cuticles.
- Base Coat: Apply a thin layer for protection.
- Color: Two thin coats for optimal opacity, allowing each to dry completely.
- Design (Optional): Carefully apply your design using nail art tools.
- Top Coat: Seal with a high-quality top coat for shine and longevity.
This Valentine’s Day, let your nails reflect your personal style! Whether you opt for classic elegance or playful fun, remember to enjoy the process! Happy painting!